Getting Started Guide
Creating an Account
Sign up: Brings you to window to create an account
Home Screen

Icons (located on top right corner)
Inbox (3rd from the right): Your system messages
Selected Samples (2nd from the right): Your selected samples
Jobs (rightmost): Your active jobs and their statuses
Creating a Study
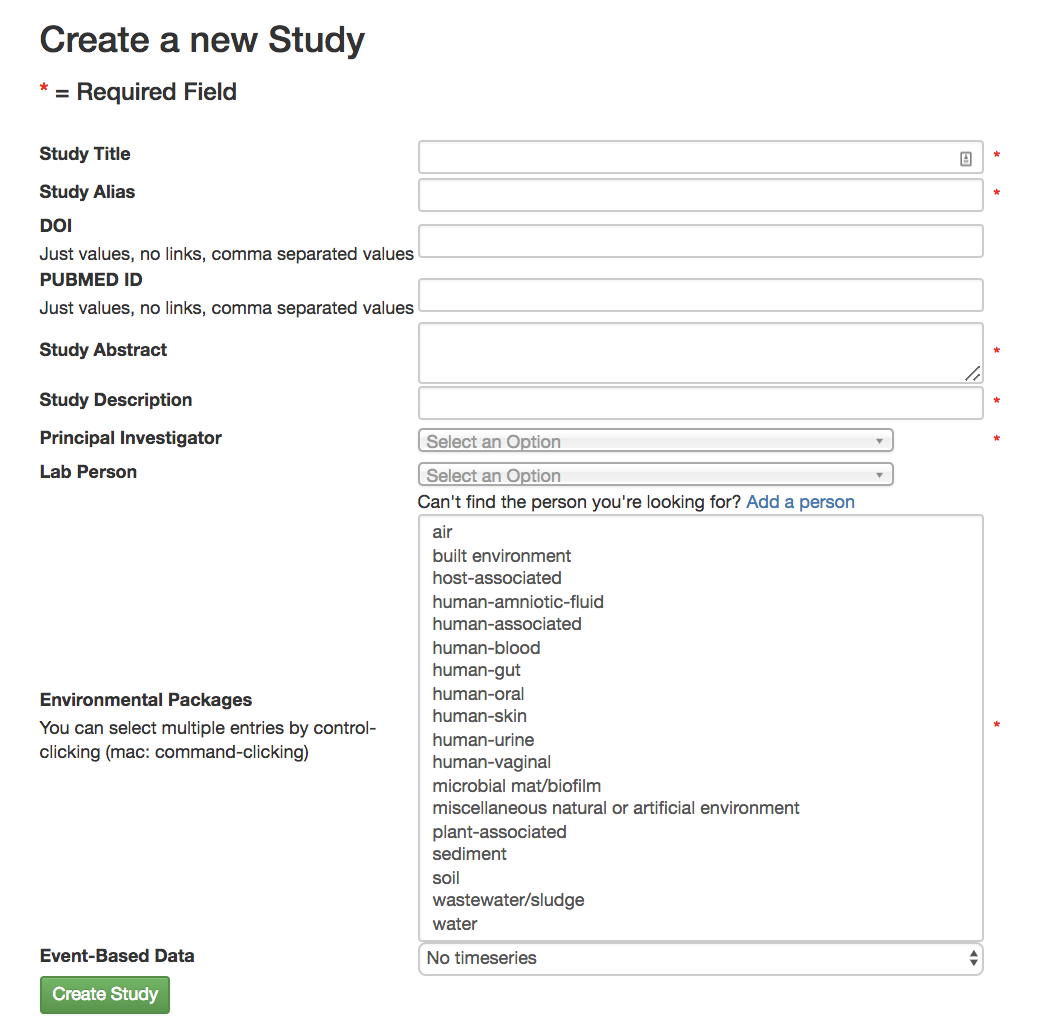
Creating a New Study/Edit Study Page
Study Title (required): Name of the experiment
Study Alias (required): A different name to put your experiment under
DOI (optional): Not required but if your paper has already been published you will be given a DOI, or Digital Object Identifier, that scientists can use to find your paper
PubMed ID (optional): Not required but if your paper has been published in PubMed it will be given a designated PubMed ID that scientists can use to help find your paper
Study Abstract (required): Abstract for your experiment
Study Description (required): Quick description of your study, shorter than the abstract
Principal Investigator (required): Whose lab it is
Lab Person (optional): Who to contact if you have questions about the experiment
Environmental Packages (optional): Describing the environment from which a biological sample originates
To find out which type of sample you have read this paper found in Nature.
Event-Based Data (optional): If your experiment contained interventions you can include that here
single intervention, real: a time series with a single intervention on one or more individuals over time
multiple intervention, real: a time series with multiple interventions on one or more individuals over time
combo intervention, real: a time series with some subjects having one intervention while other subjects have multiple interventions over time
single intervention, pseudo: a time series with a single intervention on groups with no subject being present in multiple time points
multiple intervention, pseudo: a time series with multiple interventions on groups with no subject being present in multiple time points
combo intervention, pseudo: a time series with some groups having one intervention while other groups have multiple interventions on another group with no subject being present in multiple time points
single intervention, real: a time series with a single intervention on groups with some subject being present in multiple time points while others are only present in a single time point
multiple intervention, real: a time series with multiple interventions on groups with some subject being present in multiple time points while others are only present in a single time point
combo intervention, real: a time series with some groups having single intervention while other groups having multiple interventions on groups with some subject being present in multiple time points while others are only present in a single time point

Study Information Page
Share: Shares the study with other users
Edit: Brings you to the Edit Study Page if you wanted to update your study
Delete: Deletes the study
Study tags (optional): Keywords that will help you, and others, find your study in Qiita
For example, if you’re studying soil you can add that as a tag
Must Save tags To keep them otherwise they disappear
Sample Information: A link to your metadata summary
Upload Files: A link to a screen to upload your files to
Editing a Study
Go to the “Study Information Page”
Select “Edit” from “Study Information Page” to bring you to “Edit Study Page”
Make the desired edits and select “Update Study”
Example files
You can download an example sample information file from here.
Sample information file
The sample information file will define the biological context of each
sample, with categories like sample_type, treatment,
etc. The sample_name defined in this file is used to relate each
sample in the preparation file with the biological sample.
Required fields for Qiita
Note that Qiita require to have at least two columns, including sample_name, for a
sample information file to be added to the system:
Field name |
Format |
Description |
|---|---|---|
|
free text with restrictions |
Identifies a sample. It is the primary key and must be unique. Allowed
characters are alphabetic |
Required fields for EBI submission and to make a study public
In order to submit your data to EBI, please review Making data Public in Qiita and/or send data to EBI-ENA.
Attaching the Sample Information to the Study
Upload Sample Information
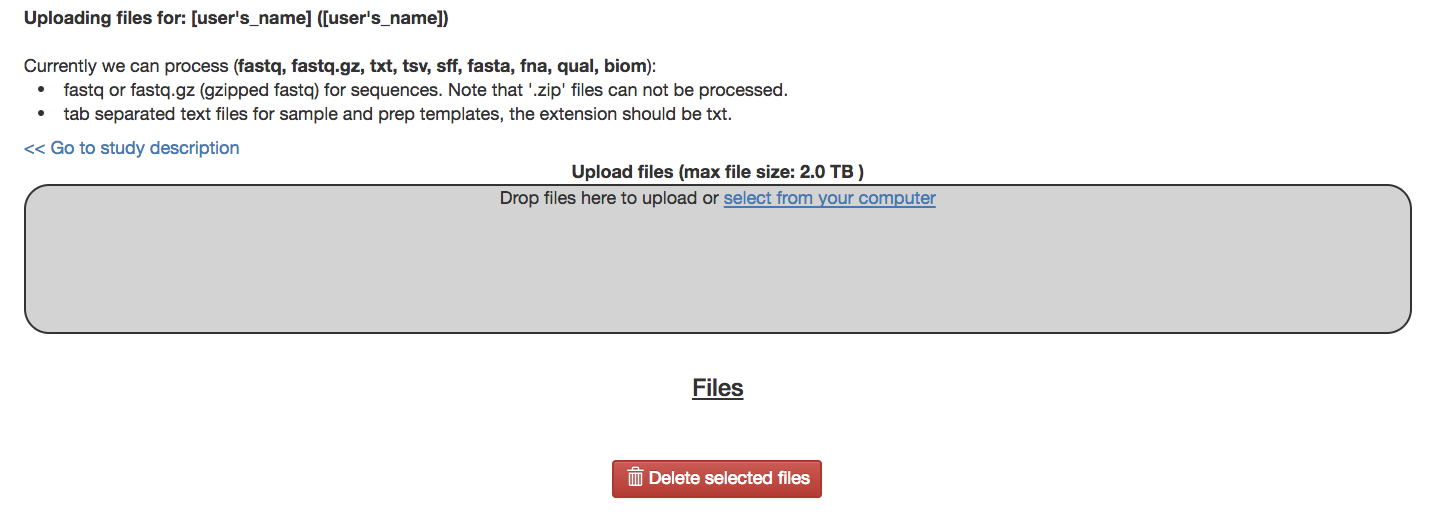
Upload Files Page
Drag your sample info file into the box to upload your files
Your uploaded samples will appear under the “Files” section
You can currently upload biom tables, .fastq files, .fastq.gz files, among others.
For a full list check the upload page of any study.
Note that ‘.zip’ files can not be processed.
Note that ‘.fasta’ and ‘.fna’ files require ‘.qual’ files for submission.
Note that ‘.txt.’ files must be tab separated and require the extension .txt.
Delete selected files: Delete a file with the selected boxes
Go to study description: Link to the study description page
Attach Sample Information
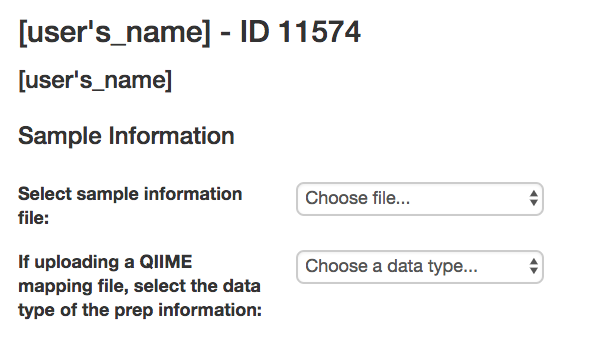
Sample Information Page
Select sample information file: Attaches the uploaded sample information to the study
If uploading a QIIME mapping file, select the data type of the prep information: Selects the data type
Create: Creates a new sample information page that includes the attached data
Viewing Sample Information
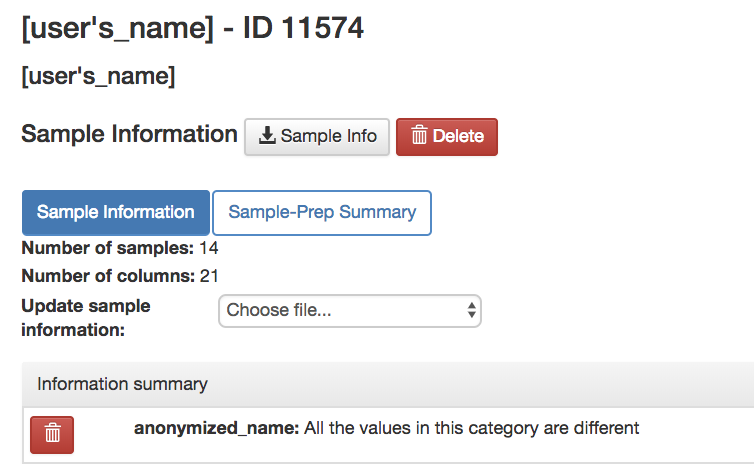
Sample Information Page
Sample Information Tab
See different metadata values
Sample Info: Downloads the metadata onto your computer
Update Sample Information: Upload a new sample information file

Sample Information Page
Sample-Prep Summary Tab
Add sample column information to table: Allows you to add an additional metadata column to the sample summary for comparison on this page
Update Sample info
If your data has not been processed…
Upload your new metadata file using the Upload Files Page
Delete your old metadata file on the Sample Information Page
Update your metadata file on the Sample Information tab on the Sample Information page
If your data has been processed…
Your past metadata file cannot be deleted but fields can be deleted
To remove data, go to the Sample Information tab on the Sample Information page and use the trash icon to delete the unwanted fields
You can update the fields that do exist (these fields can be found on the sample information tab on the sample information page)
Upload a new sample info file including only the updated field data and the sample_name field
You can add new fields
Upload a new sample info file including only the field data you want to add and the sample_name field
Sample names cannot be deleted
Any sample name change will be interpreted as a new sample
Note that these changes will not update on your analysis but these changes will not affect your processing data since the metadata isn’t applied until analysis
Creating and Working With Preparation information
Prepare information files
The set of required fields for the sample information and preparation information files varies based on the functionality that you want to use from the system.
As described in Qiita Philosophy, a Qiita study can have many biological samples, each with many preparations for different kinds of multi-omic analysis. Thus, the study will have a single sample information file that will define the biological context of each sample. Each multi-omic data type prepared will have a separate preparation information file that will describe the sequencing technology or analytical chemistry used to generate that data set.
To increase the chance of successful meta-analyses we suggest following the Earth Microbiome Protocols and Standards.
Please note that while sample information and preparation information files
are similar to a QIIME metadata file,
they are conceptually different. A QIIME metadata file includes information
about the biological context, like sample_type, and about the wet lab
processing, like BarcodeSequence. Qiita intentionally separates this
information into two separate files; it would be conceptually incorrect
to include BarcodeSequence (barcode) with the sample information, as this
information pertains to the wet lab preparation and should be placed in the
preparation information file.
Ensure that your prep information column names are correct.
Example files
You can download an example prep information file from here
Required fields for Qiita
Note that Qiita require to have at least two columns, including sample_name, for a
prep information file to be added to the system:
Field name |
Format |
Description |
|---|---|---|
|
free text with restrictions |
Identifies a sample. It is the primary key, must be unique and should
match the ones in the sample information file. Allowed characters are
alphabetic |
Required fields for pre-processing target gene data
If you are adding target gene data (e.g. 16S, 18S, ITS), there are additional columns that are required for successfully preprocessing them:
Field name |
Format |
Description |
|---|---|---|
|
IUPAC characters |
The primer sequence (this is usually the forward primer for Illumina processed data, or the barcoded primer for LS454 data; examples). |
|
IUPAC characters |
The barcode sequence (examples). |
In case that your data has been sequenced using multiple sequencing lanes or you have Per sample FASTQ files without barcode and primer information, an additional column is required.
Field name |
Format |
Description |
|---|---|---|
|
free text |
Name of your sequence file without the suffix (for example, |
Attaching Preparation Information to the Study
Upload Prep Information

Upload Files Page
Drag your data files into the box to upload your files
If you want to delete the file, press the box that appears next to that file then click delete selected files
Go to study description: Link to the study description page
Attach Prep Information

Study Description Page
Choose Add New Preparation
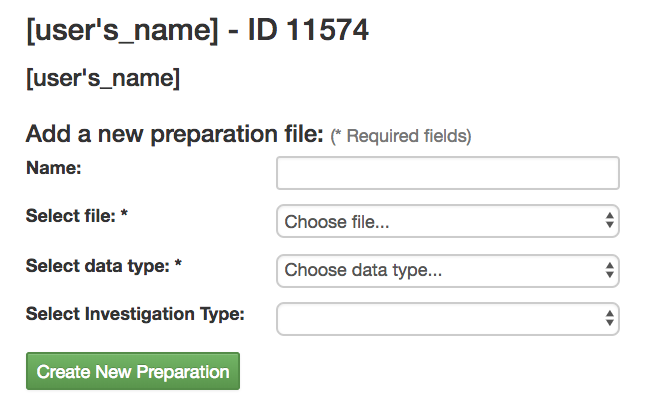
Add New Preparation Page
Select File (required): Select the preparatory information file you uploaded
Select Data Type (required): Choose for what kind of data you studied
Select Investigation Type (optional): Not required, chooses the investigation you performed
Create New Preparation: Creates a new preparation based on the data inputted above
Associate Data with Prep Information
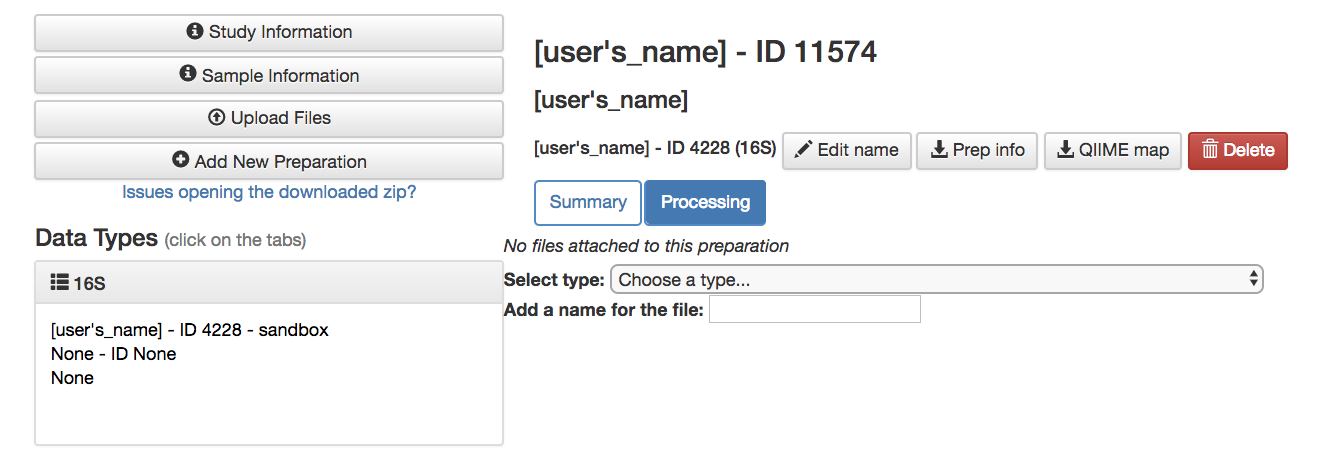
Data Type
16S, or the data type you studied dropdown: Shows the preparations created on this type of data on this study
Prep Information Page
To add files
Select Type (required): Select the file type you uploaded, causing Qiita to associate your files with this preparation
Add a name for this file (required): Give the file a name
Add Files: Shows up after Select Type has been chosen, adds files to the preparation
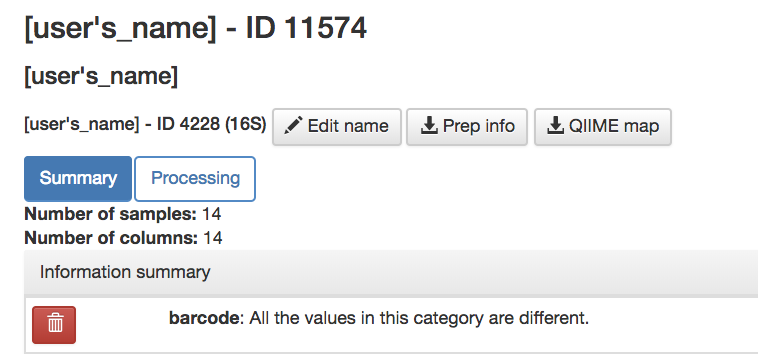
Prep Information Page
Summary Tab
Includes preparation info files of that data type that’s associated with your study
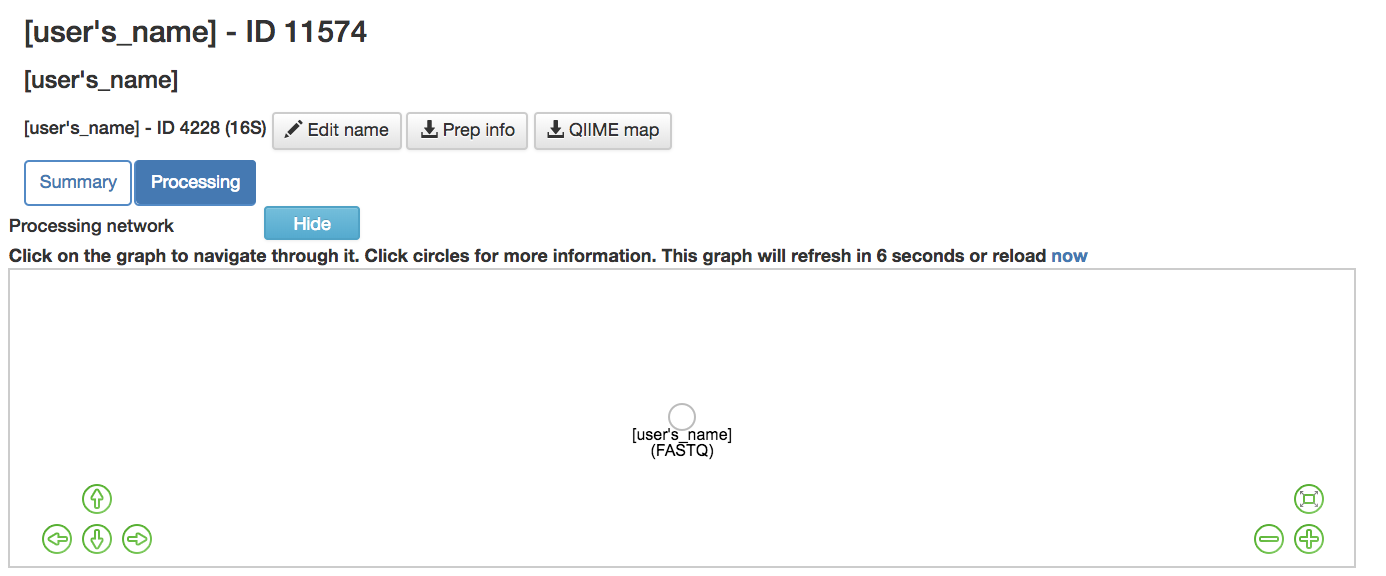
Prep Information Page
Processing Tab
Processing Network: Contains artifacts that represent your data and commands being run on your data
Hide: Hides the processing network
Update prep info
Prep Information Page
Under the “Summary” tab
Select “Update Information” and choose your updated file
Barcodes and sample names cannot be updated
Must create new preparation to update these